飯盒でオイルサーディン飯を作る
見た目は悪いけど美味しく作れたのでとりあえずメモ。
もう一度作ったら写真も載せる。。。
使用した用具
- 炊飯に使用
- 具材の調理に使用

trangia(トランギア) メスティン TR-210 【日本正規品】
- 出版社/メーカー: trangia(トランギア)
- 発売日: 2012/04/17
- メディア: スポーツ用品
- 購入: 4人 クリック: 11回
- この商品を含むブログ (8件) を見る
- コンロ

Esbit(エスビット) ポケットストーブスタンダード(固形燃料4g×20個付) ES20920000
- 出版社/メーカー: Esbit(エスビット)
- メディア: スポーツ用品
- この商品を含むブログ (1件) を見る
- 燃料は100均の固形燃料(旅館の料理とかでよく出てくる青いやつ。25g、3個入り)
食材
- 米1合
- オイルサーディン缶詰
- ネギ適量
- 醤油、料理酒 各大さじ1杯
調理手順
ご飯を炊く
- 米を研ぎ、水200mlとともにロスコの飯盒に投入。30分程度待って吸水させる。(固形燃料での飯盒炊飯は吸水が重要らしい)
- コンロに固形燃料をセットし、飯盒を火にかける。
- 火が消えるまで待ち(ただ待つだけ!)、消えたら飯盒を逆さにしてタオル等にくるんで蒸らす。
- 蒸らしている間に具材を調理。
具材の調理
- トランギアメスティンにオイルサーディン缶詰をすべて投入。汁も入れる。
- コンロに新しい燃料をセットし、火にかける。
- サーディンを炒め(身が崩れても気にしない)、醤油と料理酒を投入。引き続き、水分が軽く飛ぶ程度に炒める(煮詰める?)。
盛り付け
- ご飯を炊いた飯盒に具材とネギを投入。見た目を気にせずぐるぐるかきまぜて出来上がり。
反省
- 油っこいのが苦手な人はオイルサーディン缶詰の汁を減らした方が良さそう。
- ネギも一緒に炒めてもいいかも。あるいは万能ネギの方がいいかも。。
- 固形燃料25gの燃焼時間は炊飯には調度良いが、具材の調理に対しては長いのでもったいない。
Ubuntu 16.04 LTSにMySQLをインストールする
インストール
sudo apt update
sudo apt install mysql-server mysql-client
インストール中にrootユーザのパスワード入力を求められる。
DBの作成
$ mysql -u root -p
Enter password:
Welcome to the MySQL monitor.  Commands end with ; or \g.
Your MySQL connection id is 4
Server version: 5.7.16-0ubuntu0.16.04.1 (Ubuntu)

Copyright (c) 2000, 2016, Oracle and/or its affiliates. All rights reserved.

Oracle is a registered trademark of Oracle Corporation and/or its
affiliates. Other names may be trademarks of their respective
owners.

Type 'help;' or '\h' for help. Type '\c' to clear the current input statement.

mysql> create database test_db;
Query OK, 1 row affected (0.00 sec)

mysql> grant all on test_db.* to 'user' identified by 'password';
Query OK, 0 rows affected, 1 warning (0.03 sec)

mysql> show databases;
+--------------------+
| Database           |
+--------------------+
| information_schema |
| mysql              |
| performance_schema |
| sys                |
| test_db            |
+--------------------+
5 rows in set (0.03 sec)

mysql> quit
Bye
DBを使用してみる
$ mysql -u user -p
Enter password:
Welcome to the MySQL monitor.  Commands end with ; or \g.
Your MySQL connection id is 5
Server version: 5.7.16-0ubuntu0.16.04.1 (Ubuntu)

Copyright (c) 2000, 2016, Oracle and/or its affiliates. All rights reserved.

Oracle is a registered trademark of Oracle Corporation and/or its
affiliates. Other names may be trademarks of their respective
owners.

Type 'help;' or '\h' for help. Type '\c' to clear the current input statement.

mysql> show databases;
+--------------------+
| Database           |
+--------------------+
| information_schema |
| test_db            |
+--------------------+
2 rows in set (0.00 sec)

mysql> connect test_db;
Connection id:    6
Current database: test_db

mysql> create table emp (id INT, name varchar(20));
Query OK, 0 rows affected (0.32 sec)

mysql> insert into emp values(1, 'aaa');
Query OK, 1 row affected (0.08 sec)

mysql> insert into emp values(2, 'bbb');
Query OK, 1 row affected (0.04 sec)

mysql> select * from emp;
+------+------+
| id   | name |
+------+------+
|    1 | aaa  |
|    2 | bbb  |
+------+------+
2 rows in set (0.00 sec)

mysql> quit
Bye
MySQLの停止/起動/再起動/ステータス
$ sudo systemctl stop mysql
$ sudo systemctl start mysql
$ sudo systemctl restart mysql
$ sudo systemctl status mysql
自動起動の無効化/有効化
$ sudo systemctl disable mysql
$ sudo systemctl enable mysql
canvasをクリアする
var canvas = document.getElementById('canvas');
var context = canvas.getContext('2d');
context.clearRect(0, 0, canvas.width, canvas.height);
半年ほど前に流行ったズンドコキヨシをJSで
遅ればせながら、いまごろ知ったのでやってみる。
var array = [];
for (var i = 0; ; i++) {
  var s;
  var random = Math.round(Math.random());
  if (random == 0) {
    s = 'ズン';
  } else {
    s = 'ドコ';
  }
  console.log(s);
  array.push(s);
  if (array.length > 5) {
    array.shift();
  }

  if (array.join('') === 'ズンズンズンズンドコ') {
    console.log('キ・ヨ・シ!');
    break;
  }
}
1データが複数行で構成されたテーブルで1データを選択する
やりたいこと
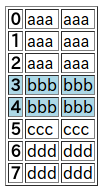
以下のようなテーブルで、0〜2行目をクリックした場合は0〜2行めを着色、3〜4行目をクリックした場合は3〜4行目を着色…したい。
| 0 | aaa | aaa |
| 1 | aaa | aaa |
| 2 | aaa | aaa |
| 3 | bbb | bbb |
| 4 | bbb | bbb |
| 5 | ccc | ccc |
| 6 | ddd | ddd |
| 7 | ddd | ddd |
コード
あまりかっこよくないですが、これでいけました。
<!DOCTYPE html>
<html>
	<head>
		<meta charset="UTF-8">
		<script>
function handler(e) {
	// 全行の色を戻す
	var allRows = document.getElementById('table').rows;
	for (var row of allRows) {
		row.style.backgroundColor = 'white';
	}

	// 選択された行と同じデータを着色
	var name = e.target.parentNode.getAttribute('name');
	var selectedRows = document.getElementsByName(name);
	for (var row of selectedRows) {
		row.style.backgroundColor = 'lightblue';
	}
}
</script>
	</head>
	<body>
		<table id="table" border="1">
			<tr name="data_a" onClick="handler(event)">
				<th>0</th><td>aaa</td><td>aaa</td>
			</tr>
			<tr name="data_a" onClick="handler(event)">
				<th>1</th><td>aaa</td><td>aaa</td>
			</tr>
			<tr name="data_a" onClick="handler(event)">
				<th>2</th><td>aaa</td><td>aaa</td>
			</tr>
			<tr name="data_b" onClick="handler(event)">
				<th>3</th><td>bbb</td><td>bbb</td>
			</tr>
			<tr name="data_b" onClick="handler(event)">
				<th>4</th><td>bbb</td><td>bbb</td>
			</tr>
			<tr name="data_c" onClick="handler(event)">
				<th>5</th><td>ccc</td><td>ccc</td>
			</tr>
			<tr name="data_d" onClick="handler(event)">
				<th>6</th><td>ddd</td><td>ddd</td>
			</tr>
			<tr name="data_d" onClick="handler(event)">
				<th>7</th><td>ddd</td><td>ddd</td>
			</tr>
		</table>
	</body>
</html>
実行結果
3行目、または4行目をクリック

5行目をクリック

Ubuntu 14.04とWindows10のデュアルブート環境でブートローダが壊れたので復旧
Ubuntu 14.04とWindows10のデュアルブート環境で色々といたずらしていたところ、ブートローダを壊してしまったらしく、いずれのOSも(と言うかgrubも)起動しなくなりました。。
復旧までの手順をメモっておきます。
boot-repair-diskでブートローダを復旧
ほぼ全自動で復旧してくれる、素敵なツールがありました。
https://sourceforge.net/p/boot-repair-cd/home/Home/
UbuntuのLiveDVDを起動し、以下の手順でインストール&起動できます。
$ sudo apt-add-repository ppa:yannubuntu/boot-repair
$ sudo apt update
$ sudo apt install boot-repair
$ boot-repair
GUIなツールが立ち上がるので、あとは特に迷うことなし。
grubは起動するようになり、Ubuntuも無事起動できました。
便利すぎる。。
Windows側のブートローダを復旧
前述の手順では、まだWindowsが起動できませんでした。。(grubメニューにWindowsが表示されていない)
今度はWindowsのシステム復旧ディスクで起動し、コマンドプロンプトを開きます。
よく分かってないので手探り。
> diskpart
> list disk
> select disk 1 →Windowsがインストールされているディスクを選ぶ
> list partition
> select partition 3 →Windowsがインストールされているパーティションを選ぶ
> active
> exit
続いてbootrecコマンドを使用。
> bootrec /fixboot →エラーになった。。
> bootrec /fixmbr →成功したらしい
この後、「boot-repair-diskでブートローダを復旧」の手順をもう一度やってみたら、Windowsも起動できるように(grubメニューに表示されるように)なりました。
文字列の連結
StringJoinerクラスを使用する
import java.util.StringJoiner;

String s = new StringJoiner(",")
                .add("あいう")
                .add("えおか")
                .add("きくけ")
                .toString();
Collectors#joiningメソッドを使用する
import java.util.stream.Collectors;
import java.util.stream.Stream;

String[] array = {"あいう", "えおか", "きくけ"};
String s = Stream.of(array)
                .collect(Collectors.joining(","));
![Rothco ハンゴウ G.I. Type Stainless Steel Canteen Cup with Lid[並行輸入品] Rothco ハンゴウ G.I. Type Stainless Steel Canteen Cup with Lid[並行輸入品]](https://images-fe.ssl-images-amazon.com/images/I/41DPQVVNW0L._SL160_.jpg)